Operating Systems Development From Scratch
Chapter 0 - Preface
A series about building a working operating system by hand - from the very first byte of the boot sector all the way up to a kernel that can run multiple processes at once.
Welcome
This is a series of articles and tutorials about computers and operating systems. The goal isn’t to slap together a toy OS and call it a day - it’s to understand why everything works the way it does. From the moment you press the power button and the BIOS hands over control, all the way to your own kernel printing its first line of text to the screen.
Along the way we’ll touch nearly every layer of a machine: CPU architecture, the boot process, memory management, interrupts, device drivers, filesystems, and multitasking. This is the kind of knowledge you rarely need when writing ordinary applications - but once you have it, you’ll never look at a computer the same way again.
I’m writing this series with one principle in mind: explain everything, hide no magic. Whenever there’s a line that amounts to “just type this and it works,” I’ll do my best to tell you what that line actually does.
What you’ll build by the end
So you can picture the road ahead, here’s the big-picture roadmap:
- A 512-byte boot sector - the first assembly code the CPU ever executes, running in 16-bit real mode.
- A multi-stage bootloader - loads the larger kernel from disk into memory.
- The jump to Protected Mode (32-bit) - setting up the GDT and enabling the CPU’s protection mechanisms.
- A kernel written in C - printing characters to the screen through the VGA text buffer.
- Interrupt handling - the IDT, CPU exceptions, hardware interrupts (IRQs), the keyboard, and the timer.
- Memory management - a physical memory manager, paging, virtual memory, and eventually our own
malloc/free. - Device drivers - keyboard, disk, timer.
- A filesystem - reading files off a simple on-disk format such as FAT.
- Multitasking - context switching, a scheduler, and running several tasks concurrently.
- (Advanced, optional) - 64-bit Long Mode, user space, and system calls.
You don’t need to understand any of this yet - it’s just the map. We’ll take it one step at a time.
What you need to know first
This series uses C and x86 assembly. You should be comfortable with both before starting. This chapter includes a quick refresher on the parts that matter most.
If you’ve never programmed before
Welcome to programming! But honestly: OS development is a terrible place to learn how to code. There’s no safety net here - no friendly error messages, no easy print to debug with, and a single mistake can freeze the whole machine without a word of explanation.
My advice: start with something gentler like Python to build up your intuition, then move to C. Once pointers, manual memory management, and how a computer actually stores data feel natural to you, come back here. It’ll be far more rewarding.
Development environment: Ubuntu Linux
This entire series is developed and tested on Ubuntu Linux. Linux is a wonderfully natural environment for OS development: the tooling is open source and complete, cross-compilers are readily available, and you’re in control of everything.
Install the toolchain:
1sudo apt update
2sudo apt install build-essential nasm qemu-system-x86 gdb
- build-essential - GCC,
make, and the core build tools. - nasm - the assembler for our x86 assembly code.
- qemu-system-x86 - a virtual machine to run and test the OS, instead of rebooting real hardware every time. Fast, and impossible to brick.
- gdb - the debugger, which we’ll wire directly into QEMU to step through the kernel.
We’ll be writing our own bootloader in assembly, so there’s no need for GRUB or any disk-image packaging tool. The final product is a raw disk image (a flat binary) that runs directly in QEMU, or that we can write to a USB stick to boot on real hardware (see the last section).
Why you need a cross-compiler
This is something the original inspiration for this series glossed over, and it trips up almost everyone. It deserves its own explanation.
The default GCC on Ubuntu is configured to build programs that run on Linux. It quietly bakes in assumptions about the host operating system - the standard library, how a program starts up, the executable format, and so on. But your kernel is the operating system. It doesn’t run on top of Linux, so all of those assumptions become subtle, maddening bugs.
The fix is to build a dedicated cross-compiler, such as i686-elf-gcc (for 32-bit) or x86_64-elf-gcc (for 64-bit). This is a build of GCC configured to emit “freestanding” code that assumes no operating system underneath it. We’ll walk through building one in its own chapter - treat it as mandatory, not optional.
An overview of C in kernel land
This assumes you already know C. This section just points out the places where C behaves differently than it does in application code.
16-bit vs. 32-bit C
The moment you power on, the CPU runs in 16-bit real mode - a mode that modern 32-bit compilers don’t support. That’s the first important thing: if you want a 16-bit real-mode OS, you need a 16-bit C compiler; if you want a 32-bit OS, you need a 32-bit compiler. 16-bit and 32-bit C are not compatible with each other.
In this series we build a 32-bit operating system (and later extend it to 64-bit), so we’ll use the matching cross-compiler.
C and executable formats
One catch with C is that it can’t emit a flat binary - a program where the entry point sits at the very first byte, with no internal structure at all, just a stream of ones and zeros.
Why would we want that? Because when the machine boots, the BIOS ROM takes control, and when it’s time to start an OS it has no idea what format anything is in. It simply loads the boot sector into memory and jumps to the first byte. It treats the bootloader as a raw flat binary - nothing more.
(There’s a nice concrete detail here: the BIOS will only accept a boot sector if its final two bytes are the signature 0x55 0xAA. Leave that off and the machine simply refuses to boot. It’s one of the first small rituals you’ll learn.)
Because of this, the first part of the bootloader (Stage 1) must be assembly. Every C compiler emits files with an internal structure - object files, libraries, or executables like ELF. Only one language natively supports raw flat binaries: assembly.
On Linux, the internal format GCC produces is ELF (Executable and Linkable Format), and that’s what we’ll use for the kernel. We’ll use a linker script to control exactly how each section of the program is laid out in memory, and objcopy to extract a flat binary when we need one.
Calling a C kernel
Once the bootloader is ready, it loads and runs the C kernel by calling into its entry point. Because the C program follows a specific internal format (ELF), the bootloader has to know how to parse that file and locate the entry point to call it. We’ll cover exactly how a bit later. This is what lets us write the kernel and its libraries in C instead of assembling everything by hand.
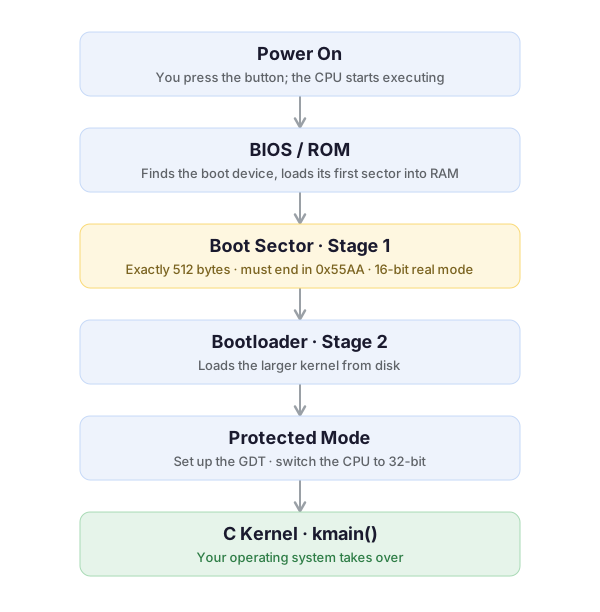
The boot chain: each stage loads the next and hands over control, until your kernel takes charge. Notice that Stage 1 must fit in a single 512-byte sector and end in the magic 0x55AA signature.
Pointers and the Physical Address Space (PAS)
Why pointers matter so much here
In systems software, pointers are everywhere. A pointer is simply a variable that holds the address of something:
1char* pointer;
This one isn’t assigned anything - it’s a wild pointer. It can point at literally anything: another variable, address 0, your own code, a hardware register. C doesn’t initialize it for you.
The Physical Address Space (PAS)
The Physical Address Space defines every address you can use. Those addresses can refer to anything in the PAS: physical memory (RAM), hardware devices, or even nothing at all. This is a big departure from application programming on a protected-mode OS, where every “address” is memory.
Here’s the classic example. In an application, this crashes with a segmentation fault:
1char* pointer = 0;
2*pointer = 0;
Run that same code in our future kernel… and nothing crashes. Instead, it overwrites the first byte of the Interrupt Vector Table.
From that, a few important truths:
- The system won’t crash on a null-pointer write.
- A pointer can address anything in the PAS - which may or may not be memory.
Reading a nonexistent address gives you garbage (whatever happened to be on the data bus). Writing to one does nothing at all. ROM devices such as the BIOS are mapped into the same PAS - you can read them, but writing to ROM is as futile as writing to nowhere.
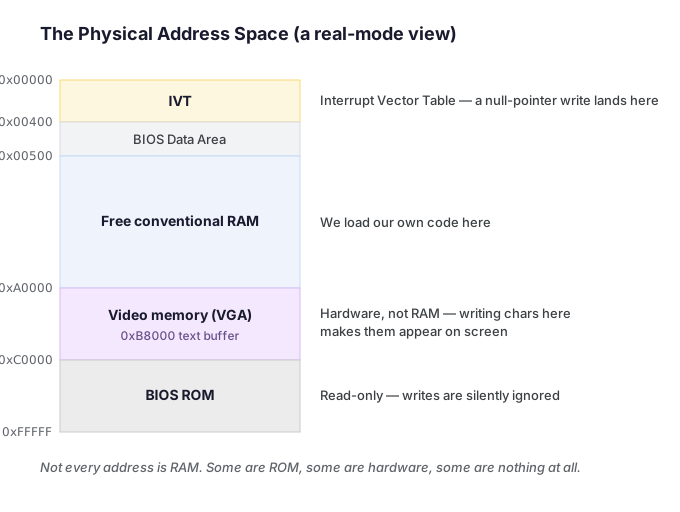
A rough map of the physical address space in real mode. The same pointer arithmetic can land you in RAM, in a hardware device, or in read-only ROM - the address alone doesn’t tell you which.
So it’s better not to think of a pointer as “a variable that points to a memory location,” but as “a variable that points to an address in the PAS” - which might be RAM, and might be something else entirely.
Memory allocation
In application land you call malloc()/free() to grab memory from the heap. In systems land, things start out very differently. At first, to “allocate” memory, you just do this:
1char* pointer = (char*)0x5000;
That’s it. Since we control everything, we simply point at some address in the PAS (it had better be RAM) and declare “that’s our new buffer.”
The key point: at first there is no dynamic memory allocation. malloc/free are system services - they require a running OS to support them. But wait - aren’t we building the OS? Exactly. That’s the whole problem. We’ll have to write our own memory-management services before we can offer a real malloc/free. Until then, the only way to “allocate” is to claim some unused region of the address space.
Inline assembly
Some things C simply can’t do on its own - talking to hardware, invoking the CPU’s low-level services. For those, we drop into assembly.
With GCC on Ubuntu, the keyword is __asm__, and the syntax is AT&T style:
1__asm__ volatile ("cli"); // disable interrupts
You can write whole blocks too:
1__asm__ volatile (
2    "cli\n\t"
3    "hlt"
4);
GCC’s extended inline assembly also lets you pass C variables in and out. We’ll lean on this constantly when writing the port I/O helpers that talk to hardware - for example, reading a byte from an I/O port:
1static inline uint8_t inb(uint16_t port) {
2    uint8_t value;
3    __asm__ volatile ("inb %1, %0" : "=a"(value) : "Nd"(port));
4    return value;
5}
The details of that syntax get their own chapter; for now, just know it’s how C and hardware learn to talk.
The standard library and the runtime (RTL)
You can use external libraries - but only for routines that don’t rely on system services. Anything like printf(), scanf(), or the memory-allocation functions ultimately needs a running OS. In practice, roughly 90% of the standard library has to be rewritten for your own OS, so it’s best to write your own from the start.
The Runtime Library is the set of services your program relies on while it runs; by their nature they assume an OS is present. On a normal system the RTL’s startup code is what runs before main() - setting up the stack, zeroing the .bss section, and so on. We write the kernel entirely in C, so we’ll provide the small slice of this that we actually need ourselves, in our assembly stub and startup code.
Over the course of the series we’ll build both: a minimal runtime that gives our C kernel what it needs to run, and a small standard library that grows as we do.
Debugging with QEMU + GDB
Here’s the hardest question in OS development: with no printf() and no ordinary debugger, what do you do when your code doesn’t work?
Our answer is QEMU paired with GDB - and this is one of the biggest advantages of developing on Linux. QEMU ships with a built-in “GDB stub” that lets GDB attach directly to the virtual machine and debug your kernel instruction by instruction, exactly like a normal program.
The basic flow: start QEMU waiting for a debugger.
1qemu-system-i386 -s -S -kernel kernel.bin
-s- open a GDB server onlocalhost:1234(shorthand for-gdb tcp::1234).-S- freeze the CPU at startup and wait for your command before running.
Then, in a second terminal, launch GDB and attach:
(gdb) target remote localhost:1234
(gdb) symbol-file kernel.elf
(gdb) break kmain
(gdb) continue
From here you can set breakpoints, single-step (stepi), inspect registers (info registers), examine memory (x/), and read variables. It’s an incredibly powerful way to see precisely what the CPU is doing at any given moment.
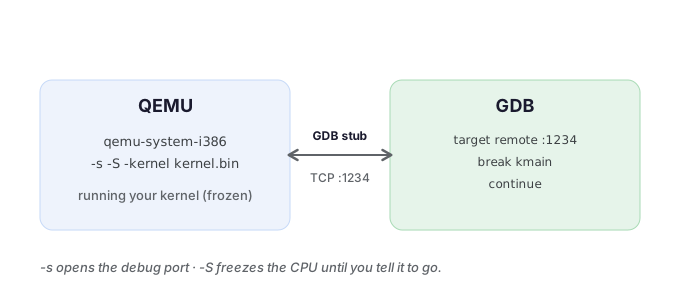
QEMU exposes a GDB stub over TCP; GDB attaches to it and drives your frozen kernel as if it were an ordinary program.
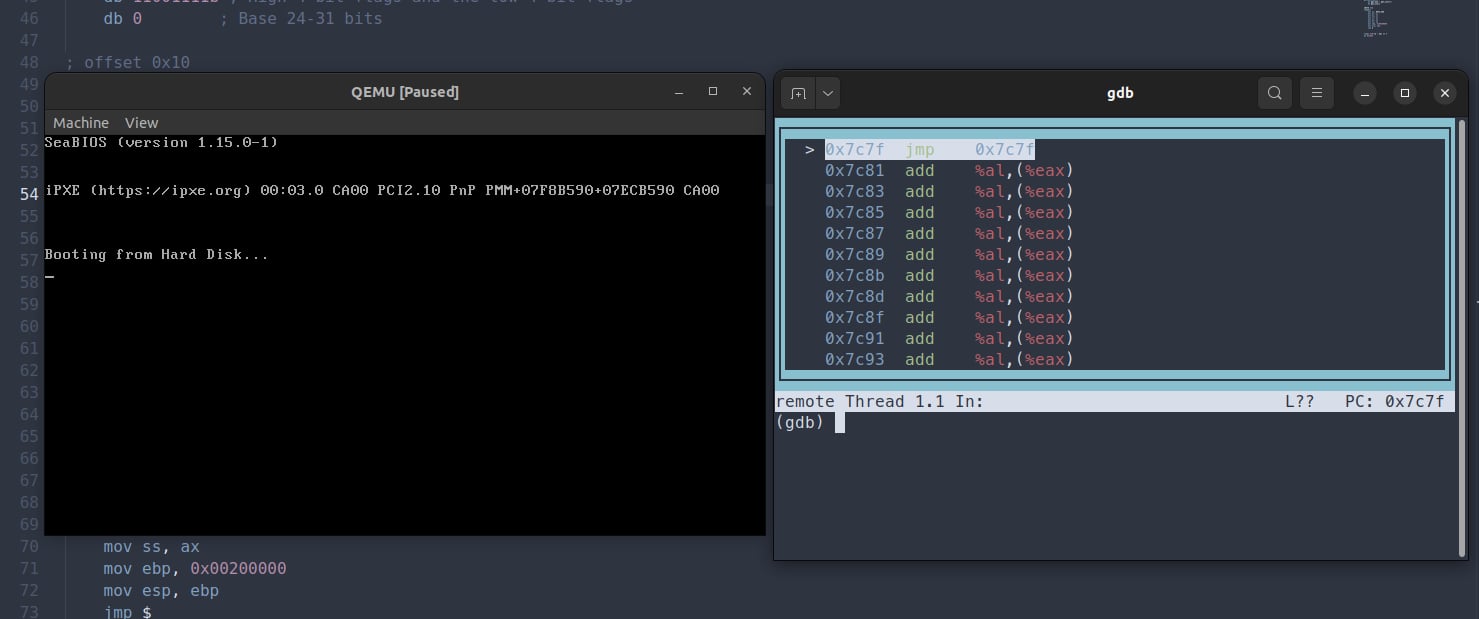 The real thing: QEMU frozen at
 Booting from Hard Disk... while GDB sits at PC: 0x7c7f - the jmp $ at the end of the boot sector, spinning in place. The add %al,(%eax) lines below it are just the zeroed padding of the sector being disassembled.
Tip: put those attach commands in a
.gdbinitfile so you don’t retype them every session.
You should also write a few simple routines early on to print information yourself - to the VGA text buffer, or out the serial port. At the very least, they’ll tell you how far the code got before it died.
Tip: QEMU can redirect the guest’s serial port straight to your terminal with
-serial stdio. “Logging over serial” is one of the handiest debugging tricks in OS work - you’ll use it constantly.
Running on real hardware: writing to USB with dd
Because we wrote our own bootloader and emit a raw flat-binary disk image, getting the OS onto real hardware is surprisingly simple: write the whole image to a USB stick with dd, then boot the machine from it.
First, identify the correct USB device. Plug it in and run lsblk - you want the whole device (/dev/sdb, /dev/sdc, …), not a partition like /dev/sdb1:
1lsblk
Then write the image:
1sudo dd if=os-image.bin of=/dev/sdX bs=512 conv=notrunc status=progress
⚠️ Warning:
ddhas earned its “disk destroyer” nickname - it overwrites blindly, no confirmation. If you pointof=at your system drive by mistake, everything on it is gone. Double-check/dev/sdXwithlsblkevery single time.
The sane workflow is: always test in QEMU first - it’s fast, safe, and gives you GDB - and only dd to a USB stick once things work, to verify on real silicon. On the physical machine, remember to enable Legacy/CSM boot in the BIOS/UEFI settings and select the USB stick as the boot device.
Further reading
Throughout the series, these will be invaluable:
- The OSDev Wiki (
wiki.osdev.org) - the largest knowledge base for OS development; almost any question you have is answered there. - The Intel® 64 and IA-32 Architectures Software Developer’s Manuals - the primary source, and the most accurate reference for the x86 CPU.
- The NASM, GNU binutils, QEMU, and GDB documentation - knowing your tools well saves an enormous amount of time.
Until next time
That wraps up the opening chapter. In the next one, we begin the adventure in earnest: what an operating system actually is, how the machine’s architecture fits together, and setting up the full development environment on Ubuntu so we can write our very first lines of code.
See you in Chapter 1.